I mentioned in a previous post that, after putting some cake
pops up on my Facebook page, I was asked if I could do some cake pops and if I delivered. I don’t deliver; even
when I do cakes for people close to home they always come and collect them. I
would, but people just chose to collect.
So being asked if I would post to Cheshire was a bit of a
challenge (and a shock!)
Before I replied, I had a look on the internet, and, sure
enough, I managed to find this tutorial from Cake Pop Princess, which gave
step-by-step instructions on how to package the pops and have them arrive in
one piece. Knowing other had successfully posted made me feel slightly more confident
about doing it.
My Mum, however, was not so convinced – she was a bit unsure
of whether it would work. (Are we gathering yet that my Mum = font of all
knowledge [but not always listened too! :p]) I, however, was reassured by the
fact that the lady asking for the pops was a friend’s mum, and because of that
I was able to tell her that I hadn’t done it before, wasn’t quite sure what I
was doing, and was slightly worried about the whole thing. Oh I do know how to
sell myself, don’t I? :p She understood all of this and was really lovely in
saying that we should go for it and see the whole thing as an experiment. So
kind of her! :)
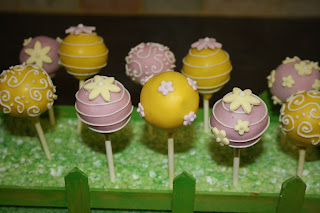
She asked me to do ‘spring’ cake pops and so picked yellow
and pink for my candy melt bases. I had to use the Renshaw melts because there
weren’t any pink Wilton ones in stock but they ended up looking quite purple.
This was still pretty but not as advertised!
I used white royal icing to pipe little swirly bits on some,
made fondant flowers for others, and generally just tried to make them look
sweet. I made the cakes pop as late as possible to keep them fresh but made
sure I left time for the decoration to dry over night to make sure everything
was firmly attached!
When I was sure they were dry, each cake pop was given its
own little bag tied with ribbon to keep it all together, and just generally
make them look like a gift.
Next it was on to the packaging! Eeep! I found a box (well
done me) and lined it with tissue so it would look pretty once I’d finished.
The polystyrene stand went in first and then the cake pops were layered up
snugly next to it. Each cake pop was wrapped individually in bubble wrap before
it went in the box.
I put a layer of thick bubble wrap on the bottom and
interlocked 6 pops onto this making sure nothing was sticking into anything.
Tissue was stuffed in between any gaps so they couldn’t go anywhere. More
bubble wrap was put on top of those and then the second layer of pops went on.
This was topped with the another layer of thick bubble wrap and finished by
folding over the tissue paper.
The final touches were the card I was asked to put in
wishing the recipient a ‘happy birthday’, and a little instruction page on what
to do with the cake pops!
The whole thing was finally wrapped in brown paper and I
wrote a begging note on the side for the post person to be kind to it!
We had a little discussion about how we would post them and
tried first to get a few prices for couriers but this seemed to be looking like
it would cost more than the price of the cake pops, so we decided against it.
We instead braved special delivery with the post office and hoped my packaging
would hold up.
And…. It did! Hurrah! I am told the cake pops arrived in
‘perfect’ condition, which was so relieving. Waiting to hear about whether they
even arrived was slightly nerve wracking, mostly because I was filled with
thoughts that the box was going to arrive crushed to bits and should have been
couriered! This is a way I might try in the future, if not just to see how much
it would cost.
I am excited that it worked and do look forward to sending
more parcels out. Because everyone likes getting post, especially when it’s
cake! :D
Vicky xx

.JPG)


