Wednesday, 30 January 2013

Birthday Cake - The Perfect Children's Tea Party


I love doing children's birthday cakes! They are so bright and colourful and always have such fun characters on top. 

As you can see from above, this one, made for Theo, the son of a family friend, was no exception.

What started as a cake featuring Peppa & George Pig, and the Gruffalos, soon had the addition of a mini Speedway racer and the last minute addition of a dinosaur!

It was so much fun to make and I felt I was able to ease into modelling the characters a lot better, probably because I had already made a Gruffalo and Peppa Pig before. It was definitely proof that practice does make perfect! Not that I am saying that they're perfect...They're really not!


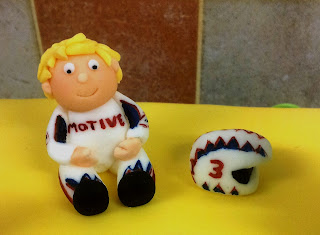
The family are big fans of speedway racing so when they asked for a speedway racer, I thought it would be cute to model Theo in his own speedway leathers.


The painting of his leathers wasn't great and is definitely something I need to work on; keeping a steady hand and maneuvering a paint brush about is currently not my strong point!

And finally came the dinosaur! The dinosaur was added last minute after his Nanna phoned us to inform us that he had been telling everyone that he was having a dinosaur cake! 


Theo came with his Mum and Nanna on the morning of his party to collect the cake. His first thoughts on seeing it? 

"That T-Rex doesn't have any scales on its tail!"

Brilliant. I am very sorry I upset him by ruining his dinosaur but I'm also very happy that he knew what it was! Other than that, he loved it, which is the most important thing! :)


Vicky x

Saturday, 26 January 2013

Magical Macarons

I am so happy! Like, seriously!

If you’ve read any of my posts from when I started this blog, you may remember that I made the dramatic decision to cut macarons out of my life FOREVER!!  Yes, I was no longer going to have sleepless nights over footless bases or cracked shells, and I was very dramatic about the whole thing.

Well, I changed my mind.

This change of mind was a prompted a little by my stubborn nature and my need to win at everything, a little by my Mum’s colleagues love for macarons, but mostly by the pretty, shiny Kitchen Aid that Santa brought me!

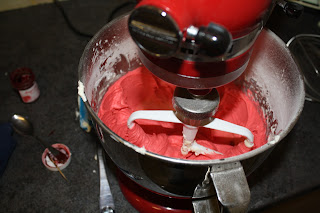
Look at her…. *sigh*


I was convinced that the Kitchen Aid would be the key to successful macarons and I may have been right...


After trying my hardest with Hisako Ogita’s recipe for macarons and not having much luck, I decided to put my Kitchen Aid to use on a different one. This one was in a book I got for Christmas which took all the fear out of making macarons. Much like the posts by http://bravetart.com/ (that I also tried,) it treats the macaron recipe like any other, and, it sounds strange, but it really helped me relax into the process. I still used some of the other tips I have picked up along the way, namely bashing the tray after piping the macarons to knock the air out, as I think this seems to be such a fundamental part of the process I couldn’t not do it. This recipe also called for the macarons to rest for 30 minutes before putting them in the oven; this allows the macarons to form a skin, and helps make the crispy outer shell when baking.

It hurts me a little to think that the key to my macaron success is solely based on my mixer so I am going to sy that my recipe and less faffing also played a role. It cannot be denied, however, that the mixer helped whisk my egg whites like never before! Oh they were beautiful! Beautifully stiff and glossy, and full of lovely air. Wonderful.

But even after all of this I was still doubtful. But then something amazing happened...!

I opened the oven door to turn my trays midway through baking and I couldn’t believe my eyes: there they were all raised with that beautiful foot right round the bottom! I could have cried! It was a beautiful moment.


They weren’t, however, totally perfect. In my fear of not wanting to knock out the air provided to my egg whites by my beautiful Kitchen Aid, I was a bit too gentle when mixing in my almond/icing sugar mix. This meant that my end batter was still quite stiff and when I piped out my circles, I was left with little blobbies on the top that didn’t quite settle in, and remained even after baking. But after my pied success, I wasn’t going to let this bother me!


I may have mentioned previously that my Mum’s work friends love macarons: they fight over them at work. So after giving them macaron cast-offs for a while now, I was so excited to be able to give them something that actually looked AND tasted like a macaron! :D They had a crispy outer shell and a chewy centre, with a sweet vanilla flavor. This was complimented by the sweet and buttery vanilla buttercream filling.


As a result of this, I am back on with my mission of making great (note I did not say ‘perfect’) macarons. I will give the basic vanilla recipe another try first, being sure to give my batter a few more folds next time and hopefully judging when I’ve got the right consistency.

Then it’s onwards and upwards to different colours and *gulp* flavours!

Vicky

Friday, 18 January 2013

Valentine's Heartbreak {Whoopie Pie Recipe Included}


I thought I would get some more practice in doing recipe posts, this time including lots of pictures to accompany method. So the lucky recipe of choice was...*drum roll*...Chocolate whoopie pies! Hurrah!

Initially, I chose whoopie pies so that I could offer them as an alternative to cupcakes for Valentine's day on my Facebook page. I had dreams of contrasting red buttercream with the deep brown chocolate whoopie pies. Aaaah... Romantic. But that dream was abruptly ended when I had an incident with the icing sugar making me feel they were not good enough to put out there as a saleable product. Broke my little perfect-cake-loving heart. But enough whining...

What I love most about whoopie pies is the mixture. It is such a lovely texture and it smells divine  - so so chocolately. It's thicker than a normal cake batter but the end result is a very light, moist cake that holds all of its chocolate flavour. The perfect combination.

I kept the buttercream vanilla because I knew I wanted to colour it, but even if you did go for a chocolate buttercream, due to the lightness of the sponge, it wouldn't be sickly.

The following recipe is taken from 'Bake Me I'm Yours... Whoopie Pies' by Jill Collins & Natalie Saville. It's a basic base recipe for chocolate pies and the only alteration I made was to use a buttermilk substitute, which will be explained below.

Ingredients

For the pies:
  • 115g/4oz soft unsalted butter
  • 220g/7oz soft brown sugar
  • 1 large egg
  • 5ml/1tsp vanilla extract
  • 225ml/8fl oz buttermilk (or alternatively - 225ml/8 fl oz milk + 2 tbsp lemon juice)
  • 60g/2oz cocoa powder 
  • 5ml/1tsp bicarbonate of soda
  • 2.5ml/1/2 tsp baking powder
  • 190g/6 3/4 oz plain flour
For the buttercream:
  • 55g/2oz unsalted butter
  • 250g/9oz icing sugar
  • 1/2 tsp/2.5 ml vanilla extract
  • 2-3 tbsp milk at room temperature 
  • Red food colouring
I also used red fondant to make little heart decorations.

Method:

1) Preheat the oven to 180/Gas 4/350 F and grease a whoopie pie tin with a little butter and a dusting of plain flour. 

Although it makes things a lot easier, you don't need a whoopie pie tin to be able to enjoy the pies! Instead, line a baking sheet with baking paper and mark out circle templates. They will need to about 2-3 inches in diameter and the batter will have to be piped into the middle with room for spreading.


2) If you are using the buttermilk substitute, measure out the milk and add 2 tbsp of lemon juice and stir it into the milk. When you come to use it, it should have curdled slightly and turned into buttermilk! 

3) Sift together the flour, cocoa, baking powder and bicarbonate of soda, and set aside. 
4) In a separate bowl, cream together the butter and sugar until pale and creamy
5) Add the egg and vanilla and mix until combined


6) Fold in half the flour mixture, then half the buttermilk, and repeat


It take a bit of effort to fold the dry ingredients and the
milk but be patient - you don't want to know the air out!
Thick, smooth and chocolately - perfect!

7) Spoon the mixture into the pie tin. 1 tbsp is plenty - the mixture is a good one for spreading and rising
8) Bake for 10-12 minutes or until the pies are firm to touch


9) Leave the pies to cool in the tins for a couple of minutes and then carefully transfer them to a wire rack to cool fully. A small palatte knife, is a great tool to do this as you need to get under the 'lid' of the pie to get it from the tin. Using a palette knife means you are less likely to damage the shape.
10) When they have properly cooled, pair up your pies! Find pie halves of similar sizes, and chose which is the top and which is the bottom. Any spare pies should be eaten immediately.


11) To make the buttercream, mix the butter and icing sugar until smooth, but do this carefully so the icing sugar doesn't fly everywhere!
12) Mix in the vanilla essence and the milk a tablespoon at a time until you get the consistency you like to work with. It can be a bit softer as it's going to be enclosed between two pies but make sure that it's not going to run out. Then add the red food colouring a bit at a time to get the desired colour.


13) Dollop your buttercream into a piping bag and swirl buttercream onto your whoopie pie bottoms. Pipe close enough to the edge so that when you put on the other half the buttercream can be seen at the sides but is not spilling over. Don't make the buttercream layer too thick either. 

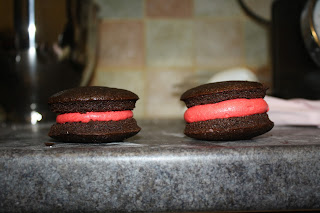
Good bad, bad pie - the pie on the right is slightly overfilled!
14) Pop on the tops, and decorate with fondant hearts if you wish! :)

Before I added my fondant hearts, I thought a nice sprinkling of icing sugar would just give the pies a nice feminine touch. It might have if I hadn't had some sort of hand spasm and got icing sugar EVERYWHERE! This just made my pies look dusty. I only recommend you do this if you are a bit gentler of hand.

Here they are, the finished product:


Luckily the icing sugar didn't divert away from the taste; the end result was a moist and light cake with a chocolatey buttercreamy taste in every mouthful.

This is the first post I have done with a recipe and pictures so I would love some feedback as to whether all the steps made sense and if you would like to try them yourself. I'm hoping this will lead to me being able to put recipes up for my own baking experiments! :)

Vicky x

Wednesday, 9 January 2013

Birthday Cake - Kings of Leon Drum

I apologise in advance for the photograph that is to follow. I forgot to take a picture of the cake and so I had to take one last minute in the car, in the dark, with it on my Mum's knee!

I was recently sent a request for a cake in the shape of the Kings of Leon kick drum and was sent the following image to help me along:

This image does not belong to me and was found via a Google search

I thought at first that this would be a relatively easy cake but as I got into it, there was a couple of obstacles I had to get around. 

The first problem was that, on first glance, I thought the drum was silver (which would have been easier,) but as I looked at it more I realised it was gold. I tried my very best to make it gold and sparkly: I made the base coat a deep ivory; I then tried to add gold lustre dust to the icing to add sparkle but it just wasn't having any effect; then, in one final attempt at something resembling glittery, I sprayed the cake with a gold spray after applying it to the cake. The end result turned out to be more yellow...

The next one was pretty much just a logistical problem - I had to get a band around the the cake, that had to sit slightly higher than the surface. But I had plenty of sugar glue to hand and my Mum to help me! I decided to put it on in two halves, as I knew I would be able to cover and joins with the brackets that were going on the side. Excellent thinking by the usually non-practical thinking me! 

Overall I was happy with the end result, apart from uneven spacing between the brackets on the side; but that's the kind of thing I get told not to tell people about because they wouldn't notice otherwise. I sent a picture of the finished drum to my musically inclined Boyfriend and thankfully he knew it was a drum and was even able to identify it as a kick drum.

Most importantly, the guy who asked me to do it was happy with it and the birthday girl loved it too!  Success!

So here it is:


Hope you like it!

Vicky x


Monday, 7 January 2013

Birthday Baileys Cupcakes

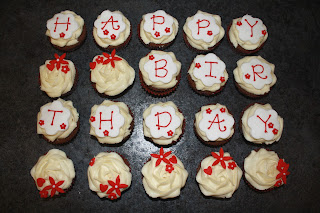
My Auntie Allison has her birthday on New Year's Eve, so a few weeks before this she subtly informed me that she had a 'big' birthday coming up. She was 45. That's not a big birthday. She just wanted cake. I don't know why because she didn't even eat it but anyway... As it was the festive season, and one of her favourite tipples is Baileys, I made chocolate cupcakes with Baileys buttercream decorated simply with red lettering and fondant hearts and flowers.


For the chocolate cupcakes:

Ingredients:

  • 4oz margarine
  • 4oz caster sugar
  • 2 eggs
  • 3oz self-raising flour
  • 1oz cocoa powder
  • a touch of baking powder (about 1/4 teaspoon)

Method:

  • Pre-heat the oven to gas mark 4/170° fan
  • Line your baking tray with some pretty cupcake cases :)
  • Cream the butter and sugar together until it's pale and creamy
  • Beat the eggs together a little until they are just broken up
  • Add the beaten eggs a little at a time to the sugar/margarine mixture
  • If the mixture starts to curdle, add a small tablespoon of flour to the mixture to bring it back. But don't use it all!
  • Fold in the rest of the flour and the baking powder in two batches to the mixture
  • Divide into cupcake cases so they are about 1/2 - 2/3 full and bake for 18 - 22 minutes


    Just a note on oven temperature: 170° fan is a little lower than gas mark 4 but if your fan oven is anything like mine, it will be enough! I used to always bake my cakes on gas mark 3 but recently it seems like it isn't hot enough. I need to invest in a thermometer...and to clean the oven!

    For the Buttercream:

    Ingredients:
    • 110g unsalted butter
    • 500g icing sugar
    • 60ml baileys
     
    Method:

    • Mix the butter with the icing sugar, making sure the butter is soft and that you add the icing sugar a bit at a time so it doesn't go everywhere!
    • Slowly add the Baileys and mix into the mixture
    • Beat the mixture until all the ingredients are incorporated and it's lovely and smooth
    • Decorate away!
     
    The best thing to do with this buttercream is just to add the Baileys a bit at a time because you might not need the full 60ml; it all depends on how you want the consistency. I didn't add enough, so, as you can see from the below picture, the icing was a bit stiff, which meant the finish on the rose swirls wasn't very neat.


    I didn't worry about this too much as I knew the icing would be partially covered by the fondant I was putting over them, but for those that I was leaving as rose swirls, I added more Baileys to the buttercream to make them flow a bit better:


    Chocolate and Baileys work so well together. The chocolatey sweetness and the creamy liqueur make such an indulgent cake - perfect for a birthday treat! The chocolate cupcake recipe is based on my fail-safe cupcake recipe, which is nice and simple and can be tweaked when you need a different flavour. The smell from baking them is a wonderful cocoa aroma and the finished cupcake is light, moist, and most importantly...chocolatey!

    With these cupcakes, I have previously used and apple corer to remove the centre of the cupcake and filled it with a chocolate and whiskey ganache before icing. This wonderfully smooth filling gives off just enough whiskey to compliment the Baileys without being too overpowering. 

    I hope you like the recipe! Let me know if you give them a try :)

    Tallulah xx


    Wednesday, 2 January 2013

    Happy New Year!

    Happy New Year everyone!

    I hope you all had a wonderful Christmas and indulged as is only proper during the festive season!

    In keeping with the new year tradition this post is going to be a little look back on my favourite cakes over the past couple of months and a look forward into this year!

    I was so glad that I decided to start up this blog again but even more pleased that I had a boyfriend and a lovely friend pushing me to creating a Facebook page. Things snowballed a little after that and I am so grateful to those who have liked the page so far, those orders I have started getting of the back of it, and the extraordinary encouragement from my friends and family.

    And it wouldn't be right if I didn't shamelessly plug my page at this moment...

    So from this here are a couple of my favourite cakes I was asked to do:

    The Gruffalo, Peppa Pig, Little Charley Bear children's birthday cake
    Katsuma! Love this guy :)
    I had a blast making this Pink Panther cake - the girl didn't cut it for a week!
    I had a nice little play this Halloween!
    Zombies!
    Yummy Chocolate Christmas Puds
    Can you make Snowmen all year round?
    A giant cupcake as a Christmas Tree
    So that's my little recap. Now... How about those New Year's Resolutions? Have you made any? 

    Mine is to more organised and less stressed. Revealing this was met with much laughter from my friends but really, I have to be! My Mum and I did not enjoy the run up to Christmas because we were still rushing about doing things on Christmas Eve and it just wasn't a pleasant experience. I'm off to a good start - I got a cake diary for Christmas and I'm getting myself a life diary so I have no excuse! 

    I also want to really push this cake thing this year and see how I go with it. I have started a list of things I want to do to get it really off the ground and I am determined to work through them. Some are slightly ambitious but that's not a bad thing!

    All in all, I am truly excited about this year. I hope you are too and I can't wait to share more cakey adventures! :) 

    Miss Tallulah xx