I thought I would get some more practice in doing recipe posts, this time including lots of pictures to accompany method. So the lucky recipe of choice was...*drum roll*...Chocolate whoopie pies! Hurrah!
Initially, I chose whoopie pies so that I could offer them as an alternative to cupcakes for Valentine's day on my Facebook page. I had dreams of contrasting red buttercream with the deep brown chocolate whoopie pies. Aaaah... Romantic. But that dream was abruptly ended when I had an incident with the icing sugar making me feel they were not good enough to put out there as a saleable product. Broke my little perfect-cake-loving heart. But enough whining...
What I love most about whoopie pies is the mixture. It is such a lovely texture and it smells divine - so so chocolately. It's thicker than a normal cake batter but the end result is a very light, moist cake that holds all of its chocolate flavour. The perfect combination.
I kept the buttercream vanilla because I knew I wanted to colour it, but even if you did go for a chocolate buttercream, due to the lightness of the sponge, it wouldn't be sickly.
The following recipe is taken from 'Bake Me I'm Yours... Whoopie Pies' by Jill Collins & Natalie Saville. It's a basic base recipe for chocolate pies and the only alteration I made was to use a buttermilk substitute, which will be explained below.
Ingredients
For the pies:
- 115g/4oz soft unsalted butter
- 220g/7oz soft brown sugar
- 1 large egg
- 5ml/1tsp vanilla extract
- 225ml/8fl oz buttermilk (or alternatively - 225ml/8 fl oz milk + 2 tbsp lemon juice)
- 60g/2oz cocoa powder
- 5ml/1tsp bicarbonate of soda
- 2.5ml/1/2 tsp baking powder
- 190g/6 3/4 oz plain flour
- 55g/2oz unsalted butter
- 250g/9oz icing sugar
- 1/2 tsp/2.5 ml vanilla extract
- 2-3 tbsp milk at room temperature
- Red food colouring
Method:
 1) Preheat the oven to 180/Gas 4/350 F and grease a whoopie pie tin with a little butter and a dusting of plain flour.

Although it makes things a lot easier, you don't need a whoopie pie tin to be able to enjoy the pies! Instead, line a baking sheet with baking paper and mark out circle templates. They will need to about 2-3 inches in diameter and the batter will have to be piped into the middle with room for spreading.

2) If you are using the buttermilk substitute, measure out the milk and add 2 tbsp of lemon juice and stir it into the milk. When you come to use it, it should have curdled slightly and turned into buttermilk!
4) In a separate bowl, cream together the butter and sugar until pale and creamy
5) Add the egg and vanilla and mix until combined


6) Fold in half the flour mixture, then half the buttermilk, and repeat
 |
| It take a bit of effort to fold the dry ingredients and the milk but be patient - you don't want to know the air out! |
 |
| Thick, smooth and chocolately - perfect! |
7) Spoon the mixture into the pie tin. 1 tbsp is plenty - the mixture is a good one for spreading and rising
8) Bake for 10-12 minutes or until the pies are firm to touch


9) Leave the pies to cool in the tins for a couple of minutes and then carefully transfer them to a wire rack to cool fully. A small palatte knife, is a great tool to do this as you need to get under the 'lid' of the pie to get it from the tin. Using a palette knife means you are less likely to damage the shape.
10) When they have properly cooled, pair up your pies! Find pie halves of similar sizes, and chose which is the top and which is the bottom. Any spare pies should be eaten immediately.

11) To make the buttercream, mix the butter and icing sugar until smooth, but do this carefully so the icing sugar doesn't fly everywhere!
12) Mix in the vanilla essence and the milk a tablespoon at a time until you get the consistency you like to work with. It can be a bit softer as it's going to be enclosed between two pies but make sure that it's not going to run out. Then add the red food colouring a bit at a time to get the desired colour.
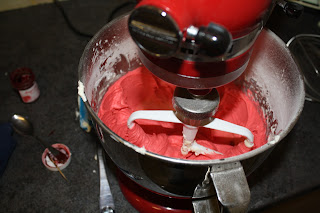

13) Dollop your buttercream into a piping bag and swirl buttercream onto your whoopie pie bottoms. Pipe close enough to the edge so that when you put on the other half the buttercream can be seen at the sides but is not spilling over. Don't make the buttercream layer too thick either.

 |
| Good bad, bad pie - the pie on the right is slightly overfilled! |
Before I added my fondant hearts, I thought a nice sprinkling of icing sugar would just give the pies a nice feminine touch. It might have if I hadn't had some sort of hand spasm and got icing sugar EVERYWHERE! This just made my pies look dusty. I only recommend you do this if you are a bit gentler of hand.
Here they are, the finished product:


Luckily the icing sugar didn't divert away from the taste; the end result was a moist and light cake with a chocolatey buttercreamy taste in every mouthful.
This is the first post I have done with a recipe and pictures so I would love some feedback as to whether all the steps made sense and if you would like to try them yourself. I'm hoping this will lead to me being able to put recipes up for my own baking experiments! :)
Vicky x


Luckily the icing sugar didn't divert away from the taste; the end result was a moist and light cake with a chocolatey buttercreamy taste in every mouthful.
This is the first post I have done with a recipe and pictures so I would love some feedback as to whether all the steps made sense and if you would like to try them yourself. I'm hoping this will lead to me being able to put recipes up for my own baking experiments! :)
Vicky x